
Authors

Joel Steidl
VP of Engineering
As you’ve likely already heard, Google’s standard Universal Analytics (UA) will be replaced by their next-generation solution, Google Analytics 4 (GA4). On July 1, 2023, UA will stop measuring hits and if you don’t create your own Google Analytics 4 property, Google will do it for you.
What’s the advantage of setting up your own GA4 property vs. waiting for Google to do it for you?
Beginning in March 2023, Google is starting to create GA4 properties for customers unless they opt out. The earlier you switch to GA4, the more quickly you’ll be able to have useful historical data for comparison. If you link your existing UA account to your GA4 account, you will get data in both places until July 1, 2023. After that date, you’ll only see new data in your GA4 account.
Most of the time, this means that your existing UA tracking code (called a Google tag ID in GA4) will continue to work as expected and the only changes you need to make are in your Google Analytics dashboard/account.
Note that if you have configured more advanced configurations in UA, those will need to be recreated in GA4. Google Support explains more about how to migrate ads, users, audiences, and goals here.
What happens to your old Universal Analytics data?
For six months after the July 1, 2023 date, you’ll still have access to historical analytics data in UA. Then, your old data will be gone so be sure to export historical data before the end of 2023.
How do you set up your own GA4 property?
If you are setting up a new property, Google now defaults to GA4. You will follow the steps and ensure your gtag.js is added to your website. This can be done manually or with a module or plugin if using a CMS.
If you have an existing UA account and you are ready to move to GA4 now, you can follow these steps.
- Make sure you are an admin for your UA property.
- Visit https://analytics.google.com/ and log into your account
- Click the Settings button (Gear)
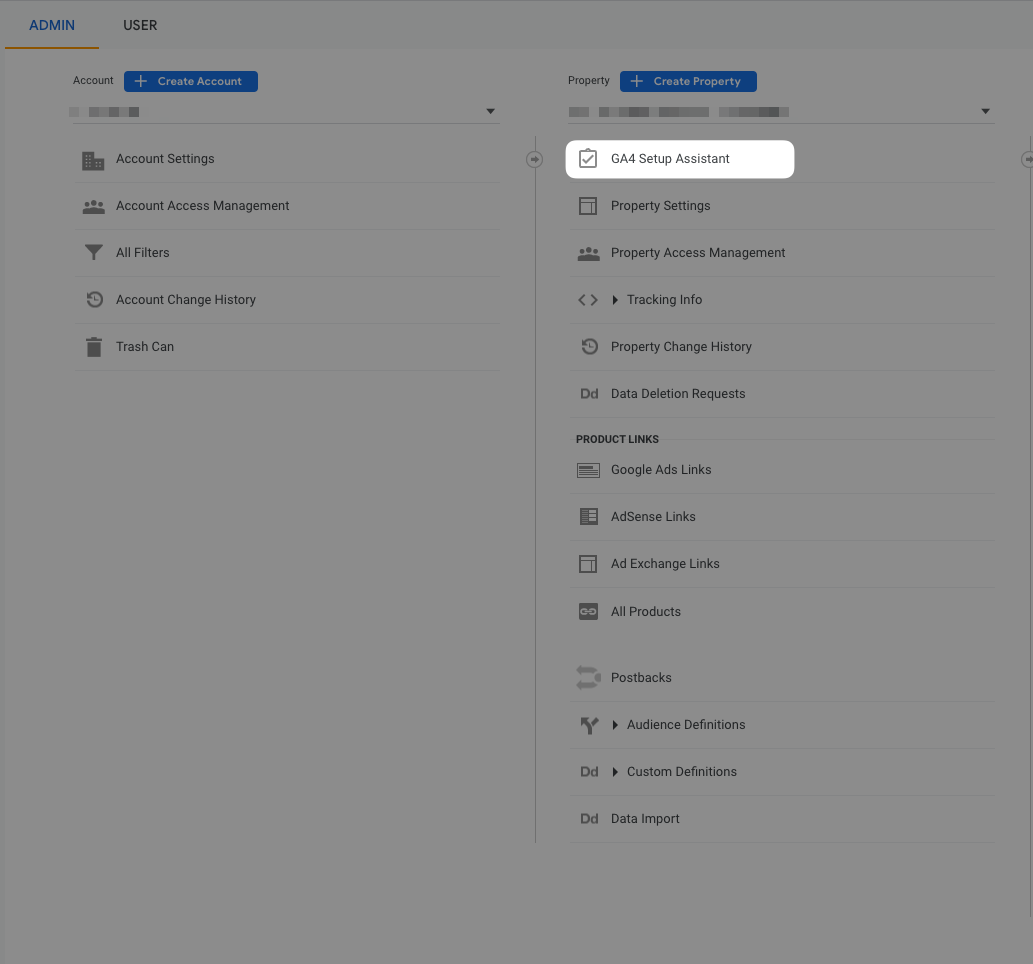
- Choose the property you want to migrate and the GA4 Setup Assistant
- Click “Get Started” and verify that you want to continue
- Your account should now appear as connected


How do you make sure GA4 is set up correctly?
Similar to UA’s tracking code, GA4 requires that your Google tag ID exists on your website. If you use a CMS like WordPress or Drupal, it is common to add this tracking code with a plugin or module.
If your Universal Analytics property uses gtag.js, the GA4 Setup Assistant wizard can reuse your existing tagging (i.e., the tag being used by your Universal Analytics property). This tag reuse saves you from having to add the tag manually to your web pages and is made possible via a feature called connected site tags.
However, if your Universal Analytics (the standard prior to August 2017) property uses analytics.js, the GA4 Setup Assistant wizard won't be able to reuse your existing tag, unless your GA4 property was created automatically. You'll need to paste the Google tag (i.e., gtag.js) directly into your website pages.
If you use Google Tag Manager (GTM), you can take a look at Google’s documentation on setting that up.
You should now see analytics flow into your existing UA property and you should see it start flowing into your newly connected GA4 property. After July 1, 2023, you will only see new data in the GA4 property.
Do you need help setting up your site’s Google Analytics account or migrating from UA to GA4? Get in touch with us at work@aten.io.